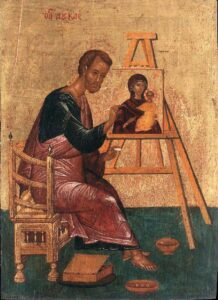
St Luke Paints the Icon of the Mother of God Hodegetria 1400s (Icon Museum Recklinghausen, Germany)
18 June 2020
By Mike Millward, former Blackburn Museum and Art Gallery Manager and Curator
Icons are portable images painted on wood and venerated by Orthodox Christians. They have been made and used since Early Christian times in the Byzantine Empire and parts of Eastern Europe, and later in Russia, which became the greatest producer of icons.
Legend has it that Jesus Christ himself miraculously produced the first icon – the self-image “Not Made by Hands” on a cloth sent after the Resurrection to heal King Agbar of Edessa (modern-day Urfa in what is now SE Turkey).

The Hospitality of Abraham painted for Blackburn Museum by Brother Aidan
St Luke the Apostle is said to have been the first icon painter when he produced a portrait of the Virgin Mary from life. The original icon, the Mother of God Hodegetria (“She who shows the Way”) has been lost, probably during the Middle Ages, but many existing icons are said to be copies of it, including more than one in the collection at Blackburn.
There are literally millions of icons, and they are still being produced in great numbers today. The most numerous holy artefacts of Orthodoxy, they have great significance to Orthodox Christians.
Icons, even some of the most venerated, are very often in poor condition. They were often overpainted when their condition deteriorated to the point of being difficult to see properly, resulting in old and famous icons having multiple layers of new paint over dirty ones beneath.
The icon painter is required to be a pious person in order for the icon to be authentic. The painter is revealing an already extant image rather than being creative, performing a traditional task in an established way; composition not subject to whim. Some of the pictorial devices used are very different from those which have developed in the West since the Renaissance. One example is “reverse perspective” in which the vanishing point is in the space occupied by the observer.
While icons often took stiff and stylised to us, their clarity points to a classical heritage.
The only icon painter I have knowingly met is Aidan Hart, then an Orthodox monk living in a hermitage in North Wales, who advised us when we started to create a gallery for our growing collection. He is still painting icons and now has a comprehensive web site where you can download some of his lectures and articles, and even buy an icon if you wish. https://aidanharticons.com/
Aidan produced a series of demonstration pieces for the museum showing the stages of production from the fruit wood panel to the finished item (The Hospitality of Abraham at the top of this post). The following section will take you through the process of painting an icon using Brother Aidan’s demonstration pieces.
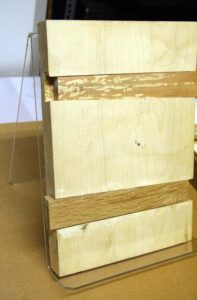
Fig 1
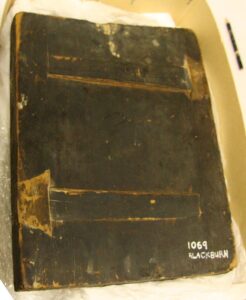
Fig 2: The back of one of the Blackburn icons showing the battens, ca 1700
Icons are painted on a wooden panel, well seasoned lime or cypress for the best, but often pine for cheaper examples. Battens can be dovetailed into the panel back to prevent warping and allow for expansion and contraction as the humidity changes throughout the year (which is a particular problem in Russia, where the temperature variations can be huge and the humidity high (Figs 1 & 2). Most icons are convex towards the painted surface – this is natural, caused by the drying out and contraction from the unpainted back of the icon.

Fig 3: Roman-period Egyptian encaustic portrait and the associated mummy
Early icons were painted in encaustic (hot wax), but since the eighth century most icons have been painted using tempera, in which egg yolk is used as the medium to carry the pigment.
There are no encaustic icons amongst the Museum collection, but there is an encaustic portrait from a Roman period Egyptian mummy (Fig 3).
The following description of the process of icon painting is closely based on Brother Aidan’s own description of his work.
A slight hollow is made in the face of a plank of wood leaving a raised border or frame, which is an integral part of the icon (Fig 4).
A layer of animal glue is applied, followed by linen, which helps bind the gesso to the board. Then gesso is applied. This consists of animal glue warmed up and mixed with a fine white powder, nowadays most commonly chalk powder. Of old, alternatives included alabaster powder and an inert form of gypsum plaster. Up to fifteen layers of this warm, liquid gesso are applied. When dry, it is made very smooth either by scraping or sanding. (Fig 5)
The design is then sketched or traced onto the panel (Fig 6) which will be based on an existing design or icon.

Fig 4
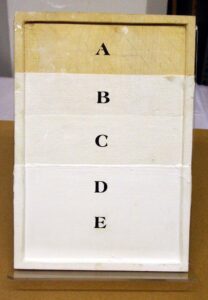
Fig 5
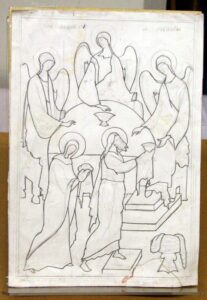
Fig 6
If gold leaf is to be applied, it is usually done now. and is generally only applied to areas where there will not be paint (Fig 7). One method of applying the gold, called oil gilding, simply requires the brushing on of a glue called gold size, followed, when the size is half set, by the gold leaf. A more complicated method called water gilding allows the gold to be polished by burnishing. With this technique some layers of clay, called bole, mixed with animal glue are applied and sanded very smooth. This is then flooded with water, a section at a tune, and the gold leaf applied. When the bole has part dried but still a bit soft a smooth stone, usually agate, is used to polish or burnish the gold.
Then the painting begins (Fig 8). Egg yolk is mixed with powdered pigments. The most common pigments are earthen – ochres, umbers and siennas. Stones are also used, usually for the brighter colours. Lapis lazuli, azurite and malachite are the most common. Burnt bone (or ivory in the old days), wood and lamp soot are common materials for black. The making of artificial pigments is an ancient practice. These include verdigris (a green made from acid and copper), lead carbonate (white), vermilion (a brilliant red, mercury sulphite) and Egyptian frit (blue). Organic pigments, or those made from plants, are not permanent enough to be used.
Generally, the darker shades are laid down first. On top of these are painted increasingly lighter and smaller areas of highlighting. In this way the iconographer does not paint with shadow (as in much naturalistic painting) but with light. It is as though the iconographer begins with darkness and death, and ends with light and resurrection. The final stage is the writing of the saint’s name (Fig 9). The icon is then blessed by a priest and venerated. After about a year the work is ready for varnishing. Traditional varnishes are tree resins (mastic or dammar), or linseed oil mixed with a drier or siccative.
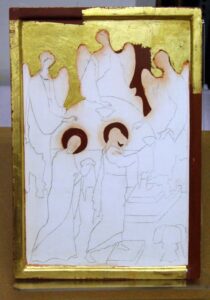
Fig 7
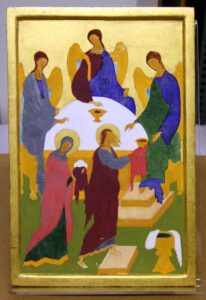
Fig 8
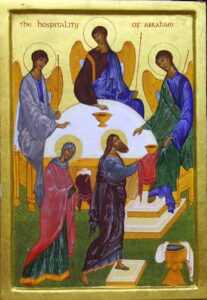
Fig 9